How I edit a sermon & get social media clips done in ~1 hour
September 13, 2024
Setting the stage: I am starting from a recorded livestream of the entire worship service. The video file is shared with me via Google Drive. I’m working with a MacBook Air, an iPad Pro, and a Canva Pro subscription.
This is not a Canva tutorial, but a description of my workflow. Use YouTube to help you with your chosen video editing software.
Step 1: Download the entire livestream.
Step 2: Roughly chop the video down to just the sermon. I do this on my iPad and then airdrop it to my mac, but you can do it however you like. Just about any computer has a native “trim” feature.
Step 3: Upload the video into Canva. (If you try to upload the entire livestream to Canva, the file will be too big.)
Step 4: Open two template documents. The first is a simple intro/outro that’s 1920×1080 pixels. The second is 1080×1920 for social media clips. (I shared simple templates in those links – take some time to brand them for your own organization.)
Step 5: Drop the sermon video into the first Canva template – the landscape one. With the video clip selected, look for “Playback” on the top. Set to 1.5x speed. This is optional but certainly saves time during the next step.

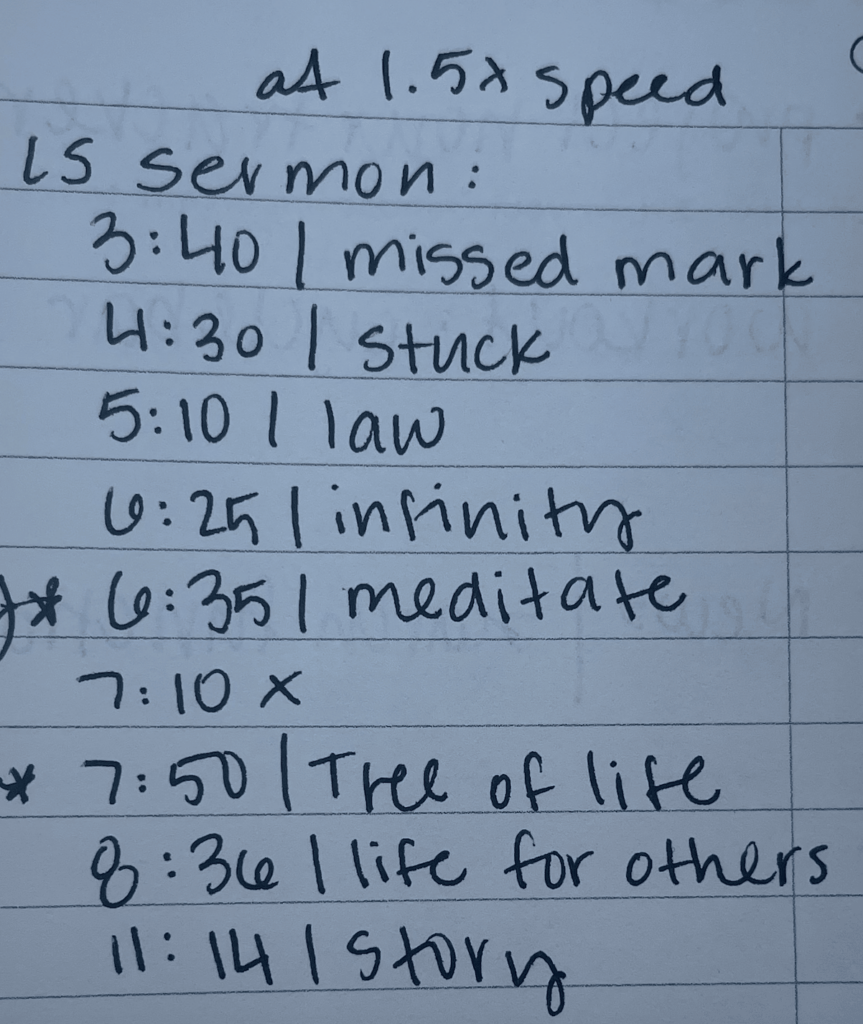
Step 6: Grab a pen and a scrap of paper.
As you watch the entire sermon, you’re going to be listening closely for the following…
Whenever the pastor starts a new train of thought, I note the time and write one or two words that help me remember the topic. If that train of thought wraps nicely in ~30 seconds, I star it. (We’ll get back to these notes in Step 9)
I’m also listening for anything that could be edited out… like a technical difficulty. If anything like that happens, I write the timestamp with an X.

In this step, I’m also keeping an ear out for anything that might not be right for a video clip, but could be adapted as a social media caption in the coming week. I pause to note these things down.
Step 7: Edit out anything with an X. Clean up the beginning and end of the clip (because we only rough chopped it in Step 2).
REMOVE 1.5 SPEED!
Step 8: Export the video from Canva. While it’s exporting, make the thumbnail.
Full-length sermon for YouTube is now complete!
Step 9: Drop the sermon video into the second Canva template – the vertical one. Put the video in 1.5 speed. Use your notes from Step 6 to split the video on any timestamps you marked with a star. Clip again where the train of thought ends. You should have multiple 30 second chunks in and among the rest of the sermon.
Step 10: Delete the video clips you no longer need.
REMOVE 1.5 SPEED ON EACH CLIP!
For social media, consider keeping the clips at 1.1-1.2x speed, depending on how quickly the pastor speaks.
Step 11: Go to Share, Download, and make sure “Download pages as separate files” is checked.

Short-form clips for social media are now complete!
Well? It’s certainly nothing groundbreaking, but I think especially step 6 and 11 could be big time-savers if you don’t already have a system down for those things.